This is one of those times where I must apologize to my audience. I had planned to do a tutorial on how to build a Space Marine Dreadnoughts, but for some reason every time I start it I feel no desire to continue. It just isn't fun, and isn't that the point of blogging?
Instead, I've found myself making terrain pieces for my own 6' x 4' playing board. It's something I've needed to do more of for quite a while now, and I'm actually enjoying doing it.
So here are the options as far as I can see it-
1. I can do a tutorial on the Dreadnought, dragging my feet the whole time until my entire audience throws up their hands in disgust.
2. Continue to build terrain, passing on tips here and there until I get my desire to scratch build the Dreadnought back
3. I can do a quick and easy tutorial I already know, such as the Blight Drones I built or a Landraider Mk 1
4. A tutorial on the current Land Raider design.
What would you all rather see? I will put up a poll to get accurate feedback from you, but if you want something specific other than these options I'm more than happy to address them here. Till next time, take care and keep building!
Friday, June 24, 2011

Tuesday, June 21, 2011
Scratch built dreadclaw painting progress 3
Well, another little update on the painting progress of the Dreadclaw. Not a whole lot of detail added, but was able to solve the dark brown issue in the center of each of the walls by adding some window screen. This gave enough texture to break up the piece a bit and remove some of the uniformity it had.


 Hope to someday soon be able to drop this onto the battlefield!
Due to my recent illness, progress on the Dreadnought tutorial is moving slower than expected. Scratch building supplies have also been strained to their maximum and have dwindled down to scraps, which makes building new projects tough to say the least (and really don't have the money for more). Worry not, scratch build fans. If I must I will begin scrounging the penny jars in the house to garner enough cash to resupply and begin this tutorial properly.
Till next time, take care and keep building.


Due to my recent illness, progress on the Dreadnought tutorial is moving slower than expected. Scratch building supplies have also been strained to their maximum and have dwindled down to scraps, which makes building new projects tough to say the least (and really don't have the money for more). Worry not, scratch build fans. If I must I will begin scrounging the penny jars in the house to garner enough cash to resupply and begin this tutorial properly.
Till next time, take care and keep building.
Saturday, June 18, 2011
Razor wire fields tutorial
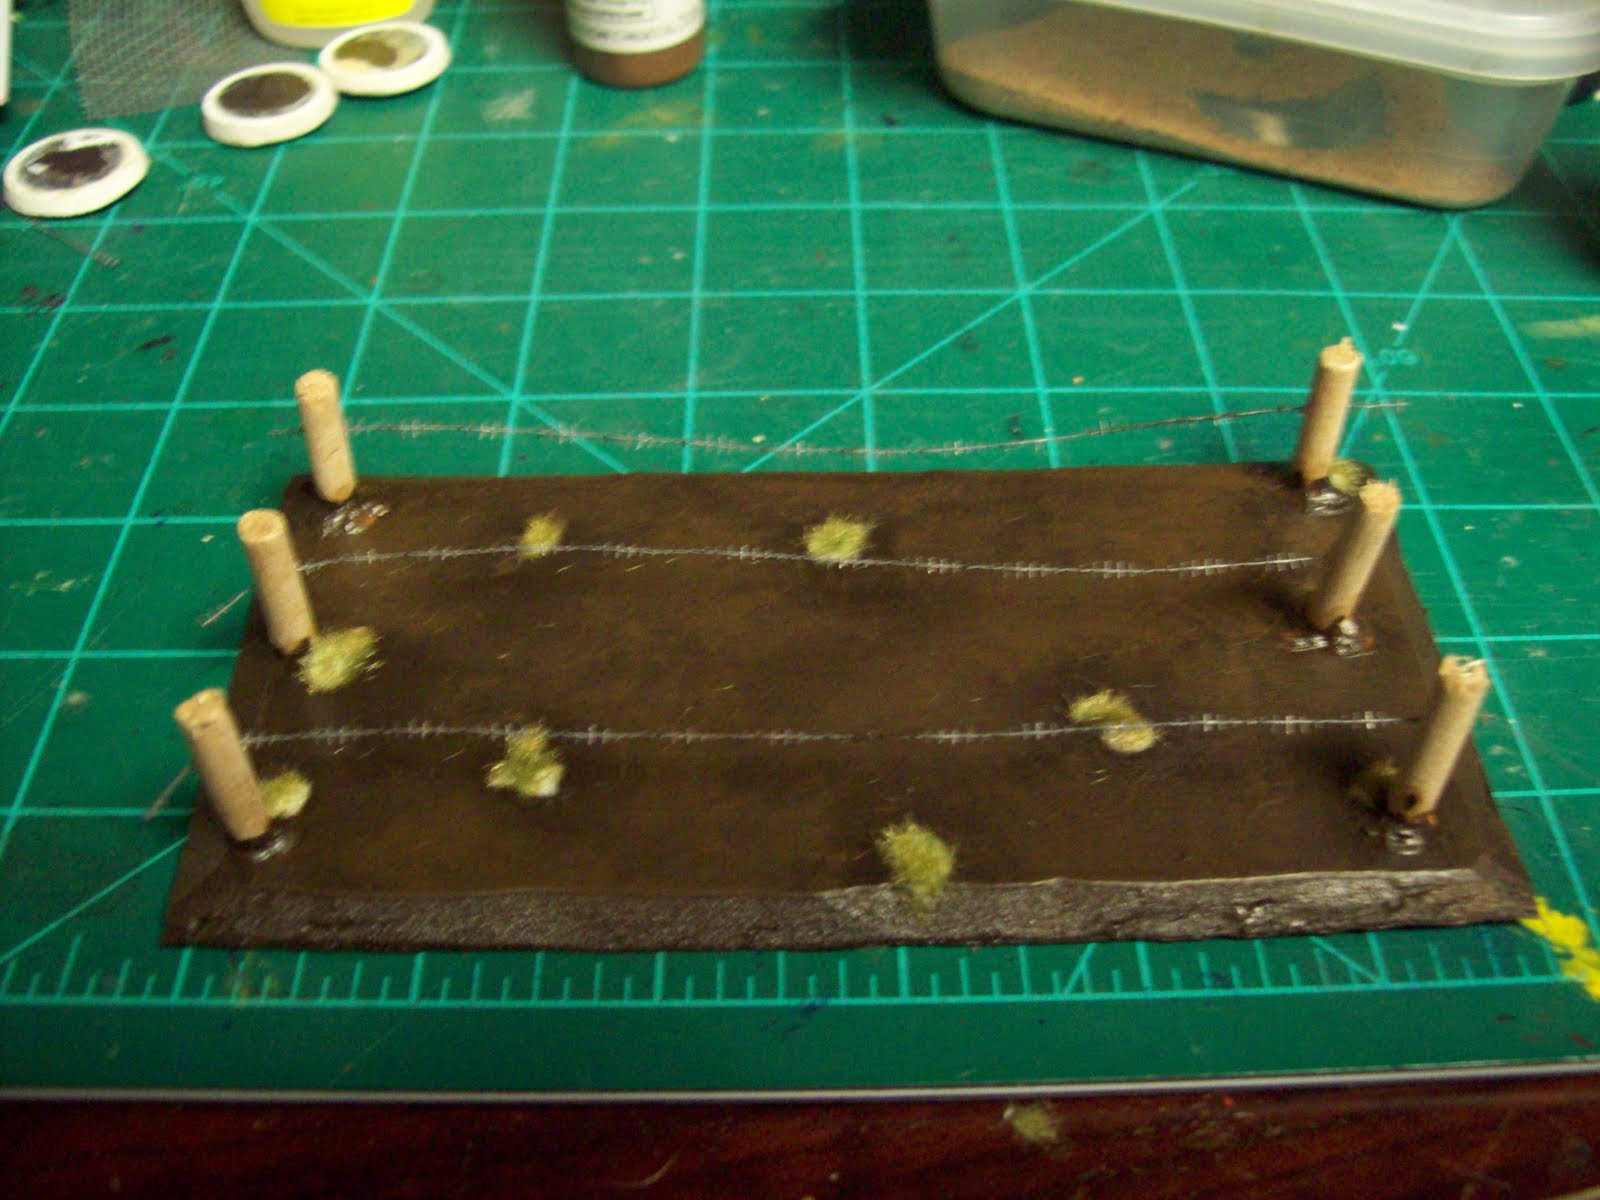
This one is so cheap and easy, you probably have most of the supplies already. When finished it will look something like this:

Materials:
Window screen (plastic roll)
Super glue
Small hobby dowel rods
Cardstock (1/16" thick)
Tools:
Hobby Knife
Cutting mat
Super Glue
Brown paint
Take your wooden dowel rod and cut two sections measuring roughly 1" long from the rod. Do this for as many sets of razor wire you want in your field. Cut a rectangle from the card stock to the size you wish the razor wire field to be. Cut your field at a 45% angle to give the impression of the field raising along each side of the rectangle.
Now lay out your window screen. Cut one strip the length you want your razor wire to be, which should reach from end to end on the field you cut.


Lay out your two wooden dowel pieces, gluing the edges of the screen pieces to the middle of each rod. Glue one rod onto the corner of the field using the super glue. When it hardens, twist the screen wire until it gives the impression the razor wire is twisted around. Glue the other dowel rod into place, pulling the screen tight. Do this at 1" intervals (remember, you want models to be able to fit in the field!).

Now that the field is basically set up, paint the field brown and highlight as appropriate. Add static grass and other bits where appropriate and enjoy your new field piece.


Tomorrow I'll add an image of the rust effects added to the razor wire.
That's it for this week. Next Monday is my 5 year anniversary being married to my wonderful wife, so there may not be a post if time doesn't permit. If it does, however, be prepared for the first of the Dreadnought tutorial. Until next time, thanks for reading and take care!
Materials:
Window screen (plastic roll)
Super glue
Small hobby dowel rods
Cardstock (1/16" thick)
Tools:
Hobby Knife
Cutting mat
Super Glue
Brown paint
Take your wooden dowel rod and cut two sections measuring roughly 1" long from the rod. Do this for as many sets of razor wire you want in your field. Cut a rectangle from the card stock to the size you wish the razor wire field to be. Cut your field at a 45% angle to give the impression of the field raising along each side of the rectangle.
Now lay out your window screen. Cut one strip the length you want your razor wire to be, which should reach from end to end on the field you cut.


Lay out your two wooden dowel pieces, gluing the edges of the screen pieces to the middle of each rod. Glue one rod onto the corner of the field using the super glue. When it hardens, twist the screen wire until it gives the impression the razor wire is twisted around. Glue the other dowel rod into place, pulling the screen tight. Do this at 1" intervals (remember, you want models to be able to fit in the field!).

Now that the field is basically set up, paint the field brown and highlight as appropriate. Add static grass and other bits where appropriate and enjoy your new field piece.


Tomorrow I'll add an image of the rust effects added to the razor wire.
That's it for this week. Next Monday is my 5 year anniversary being married to my wonderful wife, so there may not be a post if time doesn't permit. If it does, however, be prepared for the first of the Dreadnought tutorial. Until next time, thanks for reading and take care!
Wednesday, June 15, 2011
Scratch built dreadclaw painting progress 2
Welcome back everyone to another update on the Dreadclaw. Over the weekend I was able to do a little painting on the scratch built model to bring out some of the definition.


I'm debating adding more rust to the center areas so they don't look so immune to the process. As it stands now they sorta stick out. Hopefully I'll be able to fix that soon.
Other changes that will be coming up will be some details made to the bottom of the Dreadclaw, painting the wires at the top, and adding Nurgle symbols to the appropriate places (as fits the theme of my current army). Overall I like the look so far and will hopefully have a completed model on Friday. Till then, take care!


I'm debating adding more rust to the center areas so they don't look so immune to the process. As it stands now they sorta stick out. Hopefully I'll be able to fix that soon.
Other changes that will be coming up will be some details made to the bottom of the Dreadclaw, painting the wires at the top, and adding Nurgle symbols to the appropriate places (as fits the theme of my current army). Overall I like the look so far and will hopefully have a completed model on Friday. Till then, take care!
Monday, June 13, 2011
Paint Progress- Dreadclaw
Welcome back to Scratchbuilt 40k. I have a very short update on the painting progress on the Dreadclaw and thought I'd share with you gentle readers the paint holder I built just this morning.
First, the Dreadclaw:

As you can see, it has a very basic design so far. From the primed dark green I used a light green and cream colored spray paint to dust the model and give the base coat some variety in color. As I don't have an air brush I have to make due with the tools I have!
The trim is colored with a dark green which will eventually be highlighted appropriately with lighter greens. The splotches placed in random areas is the first coating of Sophisticated Finishes' Iron Metalic Surfacer, which will get another coat (as best I can) and then once dried covered in the Rust Antiquing Solution. I'll be sure to take better pictures once the model is completed.
Speaking of paints, I've decided to use the spare wood in the garage to build myself a paint bottle station. I find I'm always reaching for the wrong bottles have a general hard time finding the paints I wanted when they were strewn haphazardly (or willy-nilly, if you prefer) in cardboard boxes.
So ta-daa! Scratch building isn't just for miniatures, it seems.

Though some of the wood is a little bent, I can fix that later if it becomes a problem. For now, though, I think this will serve me better than the previous set up I was using. If you would like to share your painting/hobby stations, the comments section would be a great place for the link as I'd love to see how everyone else is set up.
Finally, the poll which asks that question which every 40k player gets asked is coming along nicely. Since I've only been able to cover 2 vehicles so far, it's no surprise to see Chaos Space Marine players are leading the pack. Plans are in the works for a scratch built Dreadnought and Landraider (latest model) tutorial, after which I'm planning tutorials for players of the other armies.
That's it for this update. On Wednesday we'll see how the rust turned out. Till then, take care!
First, the Dreadclaw:

As you can see, it has a very basic design so far. From the primed dark green I used a light green and cream colored spray paint to dust the model and give the base coat some variety in color. As I don't have an air brush I have to make due with the tools I have!
The trim is colored with a dark green which will eventually be highlighted appropriately with lighter greens. The splotches placed in random areas is the first coating of Sophisticated Finishes' Iron Metalic Surfacer, which will get another coat (as best I can) and then once dried covered in the Rust Antiquing Solution. I'll be sure to take better pictures once the model is completed.
Speaking of paints, I've decided to use the spare wood in the garage to build myself a paint bottle station. I find I'm always reaching for the wrong bottles have a general hard time finding the paints I wanted when they were strewn haphazardly (or willy-nilly, if you prefer) in cardboard boxes.
So ta-daa! Scratch building isn't just for miniatures, it seems.

Though some of the wood is a little bent, I can fix that later if it becomes a problem. For now, though, I think this will serve me better than the previous set up I was using. If you would like to share your painting/hobby stations, the comments section would be a great place for the link as I'd love to see how everyone else is set up.
Finally, the poll which asks that question which every 40k player gets asked is coming along nicely. Since I've only been able to cover 2 vehicles so far, it's no surprise to see Chaos Space Marine players are leading the pack. Plans are in the works for a scratch built Dreadnought and Landraider (latest model) tutorial, after which I'm planning tutorials for players of the other armies.
That's it for this update. On Wednesday we'll see how the rust turned out. Till then, take care!
Subscribe to:
Posts (Atom)