Friday, July 29, 2011

Hobby Friday- What are you building all this for?

Welcome back scratch-builders and enthusiasts alike.  Today's post won't be a tutorial post (we'll finish up that Mk 1 Land Raider next week), but will cover my own hobby progress and the direction I am heading with it.

When I began the Scratchbuilt 40k site roughly 4 months ago, I was just beginning to make vehicles for a Death Guard style army.  "Stick to Chaos, my good man!" I would say to myself.  Over time, however, I began to get a sense that what I was building wasn't truly mine.  There was so much potential in the 40k universe to create something uniquely my own which I hadn't even begun to discover.  As I delved into the building aspect I kept getting this nagging feeling that I would need an army which was unique to me.  It then dawned on me that in order to get the most out of the hobby I would have to create my own Space Marine Chapter.

This was somewhat tough for me.  I don't typically concern myself with fluff in the way others might.  I mean, I like it just fine as a way to tell an overall story, but I don't usually have to know that so-and-so defeated the hive fleet on the moon of that planet.  I've never felt the need to tell a battle report in the form of a fiction told from the point of view of the commander.

Additionally, I was never big on Space Marines.  They always seemed so... static.  Everyone had a Space Marine army in my area and I was always concerned with how boring mirror matches would be.  I didn't see the conversion potential and none of the current crop of Marines really interested me.

As I was building the Mk1 Land Raider, however, I started to feel that it wouldn't fit well within the current crop of Death Guard.  I wondered how I could best utilize a slew of Land Raiders and then it dawned on me- Blood Angels codex.  The only problem was I didn't care much to become yet another Blood Angels player.  The only option was to create my own chapter.

After perusing Cool Mini or Not's store I came across these Lion shoulder pads.


After looking these over other aspects of the chapter started to gel within my mind.  As someone who used to play Legend of the Five Rings, I decided the basic colors would be a golden yellow and a brown trim, much like the Lion clan of that game.  Other bits could be a gray to make them stand out.  Using Bolter and Chainsword's marine painter program, this is what I came up with.
With a color scheme and fancy new shoulder pads decided upon, It was time to come up with a name.  I did some searching and found a few lion themed Space Marine chapters already in use.  After about an hour I had chosen a name which didn't garner a first page Google search- The Pride of the Emperor.

So that is my journey so far. While I have a lot of fluff to write yet for the chapter, I believe this is a good start and leaves me with a lot of options for the future.

Wednesday, July 27, 2011

Tutorial Land Raider Mk1 Part 3

Welcome back scratch builders to part 3 of the Land Raider Mk 1 tutorial.  We have a lot to cover, so sit back and get ready to dig in!


Materials:
Plasticard (For Sale sign)
1/4" tubing (copper works best)
Soft plastic pen casing (I use Papermate as Bic has raised areas on the pen )
Thin insulated wire
Cardstock
Small bottle to cut up (I used an old, used up Vallejo paint eye dropper)
Smoke launchers (beg a friend or buy for $2 from a bits place
Top hatch (same... these are just too difficult to scratch build and most people have a bunch they'd be happy to give/ sell for super cheap to you)

Tools:
Hobby knife
Super glue
Cutting mat
Straight metal ruler
Wire snipper
Hand drill (drill bits 1.6 mm works best)
1/8" hole punch
Scotch tape

Whew, quite a list!

First, grab a piece of the Cardstock and cut 2 circles measuring 1" across.  Cover any exposed styrofoam with a material of your choosing (I used a Toblerone box and trimmed away the excess).  Glue this to the upper area next to the side doors of the Land Raider as seen in the image below.


Using a hobby knife, cut around the wheel rims to round out the sharp edges of Cardstock to conform to the wheels of the Land Raider.  To make the tracks, grab a piece of Scotch tape measuring 17"- 18" and lay it so the sticky side is face up.  Measure the wheel rims after trimming- you should come up with close to 16".  Cutting 28 strips of Plasticard which are 1" by 1/2", space them out evenly on 16" of the tape.  With the Scotch tape on the inside, wrap the tracks around the tank rims and ensure the fit is snug.  You can see this in the above image.

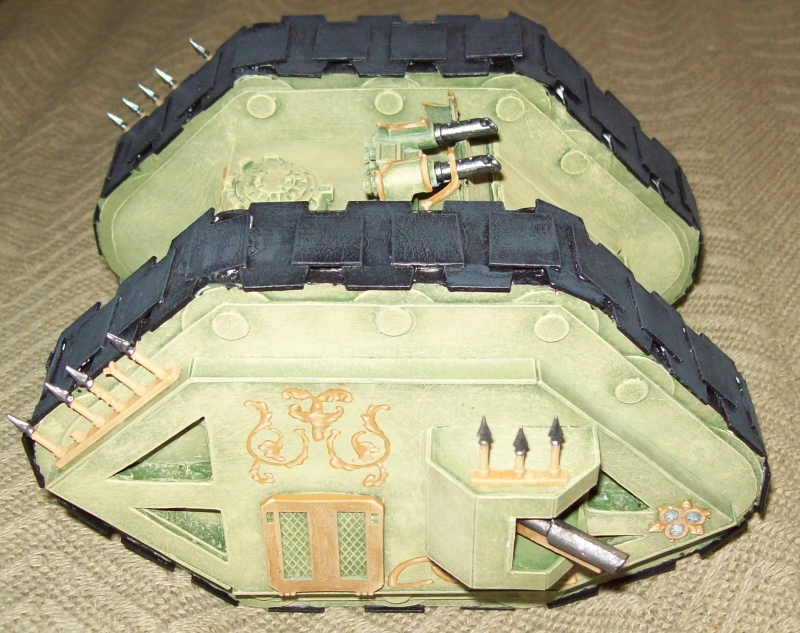
To create the front bolters (which will count as 1 twin linked bolter), use the following template or purchase/use bits to create your own.


The order to assemble goes as follows- 1 from the bottom right, one from the top right, one from the bottom left, one from the top left, one from the bottom left, one from the top right, and one from the bottom right.  In simpler terms you can start with the top left 1, cut two from the bottom left and add to either side.  Then add the two from the top right and add to either side.  Finally, finish up with the bottom right on either side.  Finish it off with a rectangular piece connecting the two bottom right pieces.  Sand the edges.  Finally, add 3 1/8" Plasticard circles glued together to form the barrel of the gun to the front.  Glue them to the front of the tank's hatch like shown below.


To make the rear exhaust, take your small bottle (which should be about 7/8" wide and 1 3/4" long.  Cut the top and bottom off and split the bottom in half from top to bottom to form half circles.  From the cardstock cut 2 circles which are 7/8" wide to help give the exhaust ports some stability and form the top and bottom of the tanks.  Cut those 2 circles in half and glue them to the top and bottom of the half circle bottles.  Using your pen casing, cut a piece for each tank 1/2" long and glue to the top's center area.  Finally, glue the two tanks to the Land Raider about 1/8" from the top of the back portion.


If you are able to get a hold of spare Las Cannon guns, add those to the side of your tanks side circles.  If not, follow these instructions for making your own Las Cannons.

Using the following template, begin the basic design of the Las Cannon.  You will need to cut out 3 identical pieces of the largest piece, 2 of the second largest, and 1 of the final two pieces.  Assembly is similar to the Bolter, in that the three largest pieces are to be glued together and the next largest glued to either side of those 3 pieces.


Cut 7 1/4" squares from the Plasticard.  Cut an area inside that square which is the thickness of the three glued together Plasticard pieces.


This next bit is complex, so I'll simply show you how those 7 pieces will be added to the guns frame.  Additionally, add a 1/8" circle to the lower angular area as shown in the image below.


Cut a 1/4" from your pen casing and add it to the area which will be facing the tank.  Using your wire clippers, cut 3 2" strips of wire.  Next use the 1/8" hole punch and make 3 circles.  Drill a hole in each one roughly 1/16".  Thread the 3 wires through the holes and spread them out evenly.  Attach one side to the underside of the Las Cannon and measure the other side to sit underneath the bottom of the angled area of the gun.


Now take your copper tube (1/4" dia by 1 1/4" long) and attach it 1/16" from the long area.  Cut your pen casing to make an angled area measuring 1/2" at the top and 5/15" at the bottom.  Slide this onto the barrel to make it a total of 2 5/8" long at the top of the barrel.  Cut 3 3/16" by 1/16" squares from the plasticard and glue them to the top and sides of the gun barrel at the back.  Add another cut pen casing piece 1/8" wide to the back of the barrel.


Add your smoke launchers above the pocket area at the front of the Land Raider.  Take the bottom of the eye dropper bottle you cut off earlier and glue it to the bottom of the top hatch.


Next time- finishing the tank treads and adding rivets/details to your tank.

Saturday, July 23, 2011

Tutorial Land Raider Mk1 Part 2

Welcome back scratch builders.  Today we will continue to build upon the frame of the Land Raider Mk 1.


 Materials:
Plasticard (For Sale signs)
Clear Scotch tape

Tools:
Standard size hole punch
1/8" Hole punch
White glue
Super glue
Hobby knife
Self healing cutting mat
Metal straight edge ruler

Begin by cutting out the template below and making 2 copies of each from the Plasticard.  Glue these into place using either the white glue or the super glue.


On all but the front/top slope of the wheel rim, cut strips of Plasticard with a width of 3/16" to fit and cover the exposed styrofoam.  For the front/top slope cut a piece which is the exposed length and 3/8" wide.  Cut a 45 degree angle at each side so it looks like the image below.


Cut out 2 rectangular strips from the Plasticard which is 1 1/2" long by 1/4" wide.  Make slits at the 1/4" mark measured from the top and the bottom and carefully bend it in these two areas.  Glue onto the tank as it appears on the image below on either side of the tank.  Also, use the 1/8" hole punch to make 28 holes from the Plasticard and place them in the center of the standard sized hole punches already on the model.


Now use the following template to cut out the side door frames.


Glue the larger frame and the smaller frame together with even spacing all around..  Do this twice.  Place the door frames at the rear on the sides of the model, about 1/4" from the bottom and 1/8" from the side trim piece


Cut 4 of the small pieces out and cut slits under the doors and glue the pieces in as seen in the image below.


As you can see, I've also added smaller rivets to the trim pieces.  This was achieved by using a small copper tube and a hand drill and pressing it into the plasticard over and over until I got the amount of rivets I wanted (this process can be seen in the Dreadclaw tutorial seen here).

Now take the Plasticard and cut 4 1 1/4" by 1/2" strips.  One of these cut right down the middle length wise.  On front door hatch area place a split piece on either side with the long angled side facing the rim wall.  Place another direction in the center.  The pieces should be even with the top and sticking out of the bottom of the piece.  Now place the last two on the bottom piece as seen in the image below.


As you can see, it now looks like a hatch which can open and close.

Since the next bit is incredibly fiddly and complex, I will save it for next time.  At that time I will cover making the treads, the front bolters, and the Las Cannon (yes, scratch built).  Till next time, take care all!

Tuesday, July 19, 2011

Tutorial: Landraider Mk1 part 1

Welcome back one and all to Scratchbuilt 40k's newest tutorial, the Mk 1 Landraider.  Today we will form the general shape of the wheel rims and the tanks center mass.  (There will be some changes and additions to the previous design seen below)


Materials Needed:
Cardstock (3/16" thickness)
Plasticard (For Sale signs)

Tools Needed:
Hobby knife
Hot glue gun
White glue (Elmers, etc)
Standard size hole punch
3/4" hole punch
Metal ruler

First, use the following template to make 4 wheel rims cut from the Cardstock.


Now, using the scrap pieces you have lying around, hot glue 3 pieces of Cardstock together and hot glue another wheel rim to them.  Do this again for the other two wheel rims.


Draw 8 1 1/2" diameter circles on the Plasticard and use your hobby knife to cut them out.  Glue them with the white glue to the side of the wheel rims at the front and back.  Now use the 3/4" hole punch and cut 14 circles from the Plasticard.  Use your hobby knife to cut these circles in half.  Using white glue, attach these half circles in the pattern shown in the image below.  Repeat this on the other side and on the second wheel rim.


Now use your hobby knife to cut the following shape out of the Plasticard.  Make 4 of these.


Glue a piece to either side of the wheel rim.


Next cut the following shape from the Cardstock and glue it using the super glue to the wheel rim.


On the other rim glue it to the other side.  This is very important as this forms the outside details of the tank.  If you are concerned about mixing this bit up, you may save this step for after you attach the tanks cab pieces.


Now using the standard size hole punch make 28 circles from the Cardstock.  Use the white glue to glue them in the way it appears in the above image.

Cut rectangular pieces of Cardstock in these shapes; 2" by 3" (bottom piece), 2" by 2 1/2" (back piece), and 2 by 2 11/16" (top piece).  Starting with the bottom piece, glue horizontally 5/8" from the bottom of the inside of the wheel rim as close to the center as you can (there should be roughly 1/8" either side showing the inside detail plasticard).  At a 90 degree angle (vertically) glue the back piece to the back of the tank (the area without the extended slope)- this will be on top of the bottom piece, not behind it.  Finally, glue the top piece horizontally, starting in front of the back piece.


Now cut a piece of Plasticard which is 3" long by 2" wide.  Split the 3" area in half by lightly scoring the Plasticard and gently bending it to create an angled area.  Glue it into place as it appears above.

Finally, use 3 pieces of Cardstock to prop the bottom of the tank and the one wheel rim.  Apply glue to the tanks cab area and attach the other wheel rim.


That completes the first part of the Mk 1 Landraider tutorial.

Thanks everyone for being so patient and checking in after the long absence.  Next time we will tackle the front door hatch, side lascannon turrets, and some other details.  Take care all!