Monday, April 30, 2012

More Eldrad Progress- Marble Staff, Bone Armor, etc

Ever notice that no matter how much time you think you have to do hobbying, it's never quite long enough?  Welcome back all to SB40k.  I've spent the last couple days trying to finish the Eldrad model I began repainting a few days earlier.  Unfortunately I haven't been able to complete the model as I've been a bit ambitious with this particular sculpt.  For now, though, I will be able to share the progression from the last update up to today.


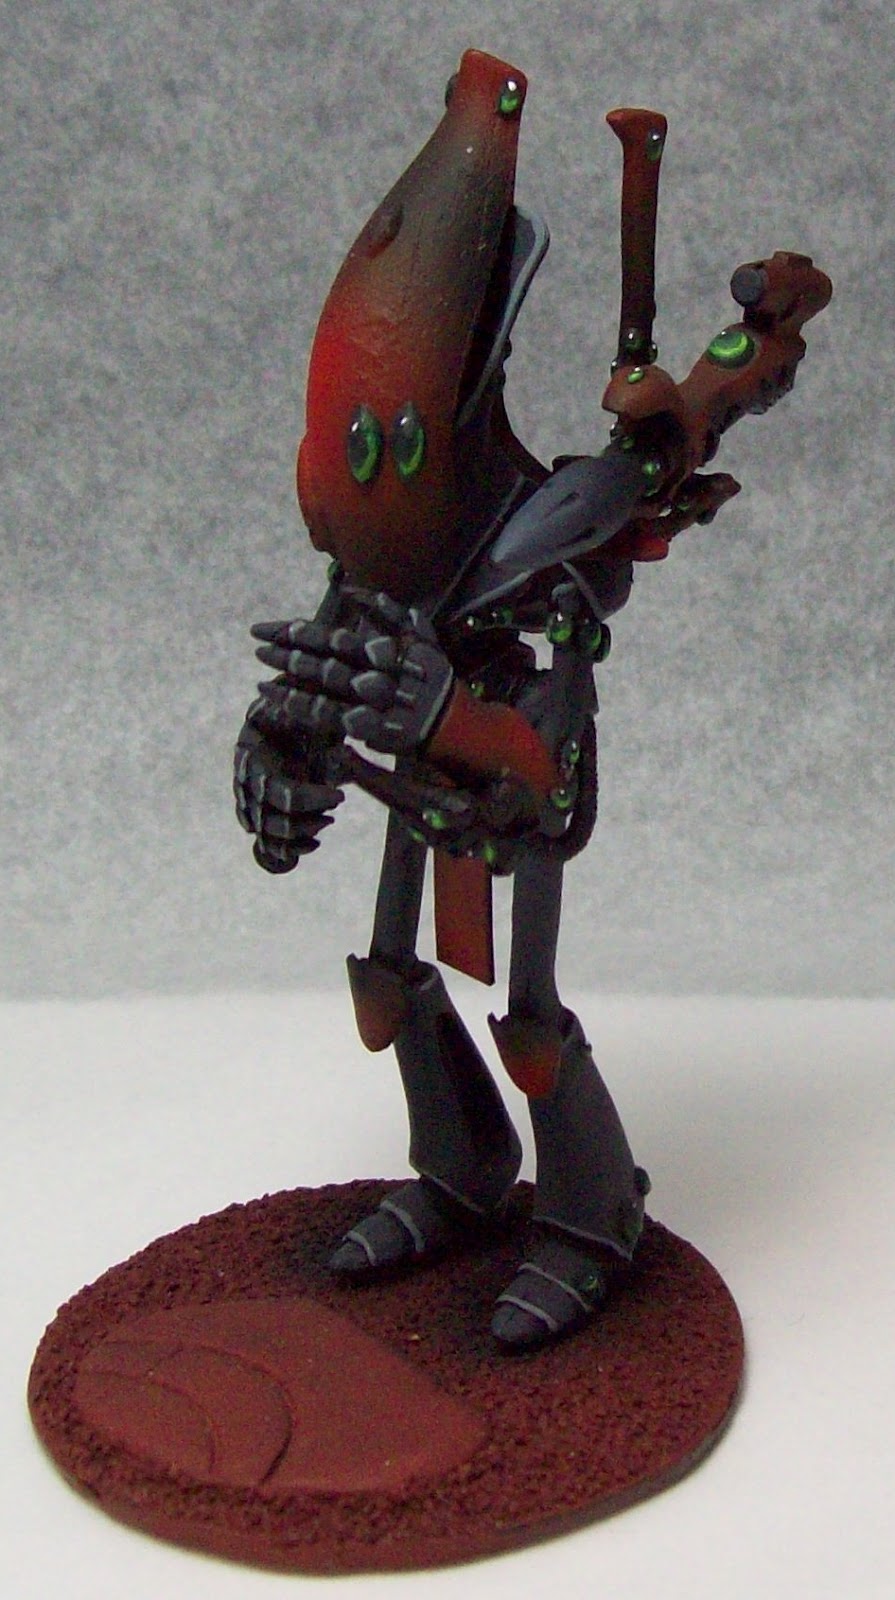
I began with the back of the cloak since I knew if this didn't work, I'd have to start over again and this would be the most time consuming part of the model.


I then painted the inner cloak area, the grey inside of the outer cloak and the red inner cloak area up to the arms.  I also began the bone armor at this point (and in retrospect could have put off this step until later on).


After the main section of bone armor, the staff received the marble treatment.  I sponged foul green (Citadel Game Colour paint) onto the staff and then used white to add the veins to the marble.  To bring the coloring together I used a watered down green ink.


Then I began the work on the helm.  The reds highlighted from black are very similar to the Guardians I painted and the face to echoe the bone armor.


On to the silver areas!  I despise metallic paints so whenever possible I avoid them and use blending to give the impression of metallics.  The gold bands still need to be darkened in some areas.


And finally the gem areas where I have completed painting underneath.  The rest of the gems will be painted after the sword and staff are completed.

As I said, a long way to go yet, but so far the model is progressing nicely.  Seeing where we began and the process taken to get there can help us discover better ways to paint the models and speed up the process.  I'd also like to say thank you to everyone who voted in the poll on the right.  Glad to know others agree that the new color scheme works better than the old!

Saturday, April 28, 2012

Eldrad Progress Picture

Sometimes I take a very long time to paint a miniature.  Often this is due to a desire to get the coloring just right or I'm trying something new, but more often than not it's a fear of having to start over again from the beginning.  Ultimately I pick up the brush and begin again despite this concern.

 
I've returned to using a wet pallet whenever possible to get smoother color transitions and allowed myself to try my hand at free painting again.  The phoenix on the cloak still isn't perfect, but I think for my level of painting skill it's as good as it is going to get until I practice more and 'break through' my current painting ceiling.  The inner cloth needs another highlight of red yet to give it the coloring I want, but I really like how the bone armor has turned out.  I've done the actual bone look in the past but I really like this look more, a sort of metallic bone.

Hopefully by Monday I'll have this finished, though I think it may be another progress picture since each step seems to take me a while to decide where I want to go with it.  Still a lot to do on this model!

Tuesday, April 24, 2012

Lazy week

Nothing new this week, I'm afraid.  Hobby burnout hit me hard, but for next Monday I'll be sharing painting progress on Eldrad Ulthran (the much hated lead space elf).  It's an old model, but still looks fantastic and is one of my favorites.

Edit- Blurry progress picture-


Take care all and I hope to see you all next Monday!

Friday, April 20, 2012

Battle damage Space Marines

Since I've been feeling a bit of hobby burnout as of late I decided it might be fun to share the battle damage I added to the Pride of the Emperor custom chapter troops and characters I've been working on.


First up is the Librarian in Terminator armor I modified from a normal Assault Terminator set, adding the book to the shoulder pad.


Sanguinary Priest in Terminator armor #1


Sanguinary Priest in Terminator Armor #2


Sanguinary Priest in Terminator armor #3


And of course the troops which go in all those vehicles I scratch built.  As you can see, I've gone a little overboard in the battle damage, but I still like how it looks.  Unfortunately I can't do any weathering since I don't have weathering pigments and I'm not certain where to start.  Anyone able to recommend a good brand or color which would work well with this bunch?

Monday, April 16, 2012

Eldar Warlock repaint almost finished

Hello everyone, welcome back to SB40k and yet another Eldar painting update.  Below we see (again) the old cartoon like paint scheme which previously adorned my Eldar Warlock (not the same model, but same paint scheme).


While I still look back on those colors with nostalgia, I can't deny I really am partial to the new look below.


Everything just looks better, from the cloak all the way to the gems.  I especially like how the nmm silver is looking on the anklet and the charm which hangs off the bag.  The only thing left to do is complete the sword hilt in the same fashion and do a little more work on the sword.

Which do you prefer?  Old vs. New, here we come!

Friday, April 13, 2012

Quick Thanks to Those Who Hit Follow...

I just wanted to say a quick 'thank you' to all 100 of you who chose to follow my blog.  When things get tough or I wonder why I continue to paint armies and build vehicles which haven't seen a table top in over four months, I just head back here and see the wonderful encouragement you've all given me.  Without all of your kind comments and continued support I probably would have allowed myself to become yet another video game junkie.

So again, thank you!  I'll continue normal updates Monday night with a painted Warlock and hopefully some airbrushing progress on the Eldar vehicles.  Till then, happy hobbying!

Monday, April 9, 2012

Wraithlord turned Wraithseer

Welcome back scratch builders and 40k enthusiasts!  A few months ago I decided to update my old Wraithlords to fit more with the current look but still retain a lot of the old model feel to them.  Today I share my attempt at the Wraithseer.

And then I play my air guitar like THIS!

First we'll start with the model itself.  As you can see, I've removed the flamer and shuriken catapult from the arms as the Wraithseer doesn't have these options.  I've also added shoulder pads, knee pads, and pushed up the head to include a cowl piece like I did for the other Wraithlords.


My favorite addition, however, is the spear.  Using a copper tube, a pulse laser left over from the Forge World Hornet, and some plasticard, I was able to create a weapon that looks like it would be wielded by a giant alien construct.

Dead Space Marines make great resting steps.

Putting on the Ritz!

Now I just have to decide if I want the blade end up or down.  I think I have my own preference but I'd like to know what you all think.  Up or down?

Friday, April 6, 2012

Short update- stripping paint from models

Hello all and welcome back to SB40k.  This will be a quick post updating my progress (which, admittedly, isn't much) and where I hope to go from here.

I've always hated stripping paint from models.  The first time I painted these Eldar models the color scheme was blue and grey and very flat.  I needed to remove the paint from those models and used turpentine, which may have been my first mistake.  The second mistake was doing so in a basement with almost no ventilation (hopefully I only killed the brain cells I wasn't using).  Needless to say, I really dislike removing paint from models.

However, these days we have Simple Green concentrate, which works pretty well removing paint from models.  Metal, plastic, and even FW resin are all safe to use this product.  I still needed to do some scrubbing with an old tooth brush, but overall I think it worked fairly well.


That is before the paint removal, and the image below is afterward.


The model is now smooth enough to repaint (though since it is a very old wave serpent the front fin pieces don't really match up with how the models look now) and I'll be building the side fin pieces from scratch.

On to the Guardians.  As you can see in the images below, I've been steadily working on the Guardians to help them stand out more and bring out some of the color I've already applied to the dark scheme I have gone with.  This, of course, is much different than the super bright scheme I had previously.  I'm thinking something is still missing, though.  Perhaps the shoulder pads need a red highlight as well.


Anyways, that's about it for now.  As always questions and comments are very welcome and always answered/responded to.

Monday, April 2, 2012

Gems Gems Everywhere Gems

Welcome back fellow hobby enthusiasts to another update on my Eldar army repainting in progress.  Though it may appear not much has progressed on this front, I've actually made great headway on the Eldar army.  With that, on to the pictures!


This is the Eldar Hornet so far.  I've only done a little detailing so far, so what you see is a very basic paint scheme so far.  The underside was painted with the airbrush using Model Air intermediate blue followed by light grey as a highlight.  The top was based in black and highlighted in select areas with red.  The windshield I painted by painting it a dark blue, drew the lines with bluerlm65, and then went over it again with the dark blue.  Gems are various shades of green up to a little yellow.  When I'm feeling brave, I'll begin the drawing for the freehand which will adorn this and the other vehicles in the army.


I've also painted the Eldar Missile Launchers for the two Wraithlords.  I still have to do a little detail on them and create the swords they will be wielding, but they are looking pretty good for a WIP.


By this point painting gems was making me absolutely crazy.  I still have to bring out the reds on these Guardian models and pick out some extra details.

Overall, not bad for a week of painting!  I'm hoping by the end of the week I'll have all of these models done to table-top quality and will be able to move on to the second Hornet, the Warp Hunter, and the Wave Serpent.  However, if I'm feeling overwhelmed by gems (which is very possible) I may finish modeling the Wraithseer I've been building and have that prepared for next Monday.

On a side note, Ron (of From the Warp), and I have been discussing what it would take to create a Space Marine shoulder pad stamping method and have a theory on how best to do this.  I think it would be a one color process which would allow people to detail the initial stamping but will allow for a uniform look to the shoulder pads which would save time.  Any interest in seeing my process and seeing my successes/failures in this?