Sunday, August 28, 2011

Hobby Friday- Two days late and a brain cell short

So over the weekend I got a few chances to play around with the airbrush.  I think there are a few successes, as well as failures which are obvious when looking at the pieces.  It will certainly help me begin to have an appreciation for the process and what it takes to properly care of a tool like an airbrush.  But who cares about that, right?  Lets see those successes and failures!


The above image was a Soul Grinder I had painted quite a while ago.  The red bits were once blue and weren't highlighted well, followed with a gold trim.  It was a tedious process to paint, and so far I much prefer the airbrush!


These are very hard to judge.  On the one hand, I didn't finish the wheel rims with the airbrush, but I'm thinking it will be easier to paint using a hand brush and add highlights using the airbrush.  The distribution of brown over the yellow is growing on me and matches the Tactical Marine in the image much better than when I used the same process as the Marine.  Hopefully when I start painting details it will look much better, but for now I'm on the fence.

Well, that is all the hobby work I did the last couple days.  Soon I will tackle making the weapons for the Las-Plas Razorback and some other bits.  Till then, take care!

Wednesday, August 24, 2011

Airbrush- A noob's first thoughts

Well, finally have had some time to try out the airbrush for roughly an hour.  There are a few things I have discovered I hadn't really thought of, and hopefully I will be able to remedy it soon.

For those who are thinking of getting an airbrush, there are a few things to consider:

1. Get a cheap toothbrush.  All that acrylic paint isn't going to remove itself, and having a gentle bunch of bristles to softly remove excess build up will pretty much be a must.

2. Start big.  After the first 5 minutes of trying to airbrush soft pieces of styrofoam, I recognized the error of my ways as they were blown willy nilly across the painting area.  Duh, right?  After fiddling with this, I grabbed an old Soul Grinder model I wasn't happy with and began a base coat of black paint for it.  This allowed me to get an idea on how to operate the brush and experiment.

3. Take notes.  Seriously, do this.  It will help you remember how being further back creates a different effect than being up close, just how much pressure you want to put on the paint release, how much paint you want for certain jobs (count the turns on the back release!), and how thick to mix your paint with water/thinning agent.

4. Figure in clean up time.  I spent roughly 10 minutes cleaning out the airbrush after using it for an hour.

5. Turn off the compressor periodically.  Yeah, I know it says it has an automatic shut off.  That there is bull-pucky.  When you see that pressure gauge sitting still at 50-60 psi, don't be afraid to reach over and give it a shut off.  You can always turn it back on again and won't risk overheating the compressor.

And most important-
6. Have fun.  It's easy to forget this step as starting out a new technique can be frustrating when it isn't working out as planned.  Seriously, just enjoy yourself.  You won't be an expert in the first week of getting it, and as long as you have a decent idea on how you like your colors you'll catch on to the nuances.

That's pretty much it for today.  As soon as I start destroying that Soul Grinder with some colors other than black I'll be sure to post up some pictures for the interwebs to laugh at.  ;)  Till then, take care!

Friday, August 19, 2011

Hobby Friday: The toys have arrived!

After waiting all week, my new toys have finally arrived.  First, the airbrush.

 Oh, for me?  Why, don't mind if I do!


Why hello there my new little friend!


I foresee a long, happy life together.

And now, for the bases which I will replicate for the Pride of the Emperor Space Marine army. 


I went with a ruins motif for the basing.  While I loved the idea of a more plains style, it honestly seemed a little dull.  This, however, will make my bases as striking (probably more so, really) than the models themselves!

At this point I'm still building the 3 Razorbacks and 2 Predators (which are super time consuming and aren't really image worthy yet) and putting together and altering Space Marines as quickly as I can into Assault Squads.  I set out to make a hobby army, and by golly that seems to be exactly what I have!  Ultimately this is a labor of love, and time will tell if I am able to show that in the final product.

Till next time!

Wednesday, August 17, 2011

Upcoming updates- Don't build that Rhino!

Hey everyone, just wanted to give you all a heads up and let you know that some changes will be made to the first tutorial, the Rhino.  After going over it, it is way (way) too big for a Space Marine Rhino.  I will be re-labeling it since some people from a non-40k forum have been using the template for a post apocalyptic game. 

However, it also means I will be revisiting the size of the Rhino and begin a more accurate tutorial on it sometime next week if time allows.  What does this mean for you?  Simply put, it will attempt to visit the Rhino build as a base template and follow up later posts which will allow people to make their Razorbacks, Predators, and other Rhino style vehicles be detailing the differences.

Currently diving into my own army needs by building/converting 20 Tactical Marines into 20 Assault Marines, have resin bases being shipped, and am building 3 Razorbacks and 2 Predators from scratch.  You can see how this would be time consuming!

So stay tuned!

Saturday, August 13, 2011

Taking the next step- getting an airbrush

I am extremely excited to share that my wife has given me permission (yes, while permission isn't necessarily needed, it's always nice to have that nod of acceptance) to spend significant funds on an airbrush.

After some careful consideration, I've decided on the Iwata 4298 Kustom CS Airbrush.  It has all the features people recommend, including dual action, gravity feed, and internal mixing of the paint and air.


In addition to this, I will be getting a compressor with auto-stop (which apparently reduces overheating), a tank to keep consistent air pressure, and a gauge that indicates how much pressure is in the air tank.


Needless to say, I am quite excited to be making the next big leap in my hobby progress.  A part of me is a little nervous about the learning curve associated with dual action air brushes, but I'm sure after a while (and a ton of paint!) I will be able to get the hang of it.

Friday, August 12, 2011

Hobby Friday- Making that tactical squad an assault squad

When I decided on the units I would want for the Pride of the Emperor Space Marine army list, a counts-as Blood Angels army, I knew right away that I would want assault squads without the jump packs to be put in Razorbacks and a Land Raider.  Unfortunately, the Assault squad didn't come with regular back packs, so I'd have to do some converting of the Tactical squads.

The first thing I noticed were the Bolters and a severe lack of a chain sword.  Next I noticed there were no weapon options for the Sergeant, which I planned to put lightning claws on (lions have claws, of course).  I was going to have to do some converting to get these guys as close to WISIWYG as I could.


To solve the problem of the bolt pistol, it seemed logical to chop the end of the bolter down and adjust the arms to be pointing outward.  After cutting this piece off, I noticed that it was just about the same length as the open left hand of the tactical marines that normally hold part of the bolter.  It dawned on me that a great weapon which would be easy to build would be a katar, using the left over bolter piece as the handle and simply plasticarding the remaining blade area.  Since I'd been struggling to come up with a good assault weapon for the chapter, this was a fortuitous turn of events.


And for a final look at what an assault marine will look like-


After doing some trimming and getting the model in position, the remaining 15 would end up being a piece of cake to adjust.  In the end the fluff will justify katar as a humming weapon which in all ways works like a chain sword.  Now for the Sergeants and those lightning claws!

Thursday, August 11, 2011

Thursday post- Pride of the Emperor update

Thought I'd include a quick update on the Pride of the Emperor progress so far.  (busy with wedding and other stuff, so will be a short post)


 The above image is the Tactical squad I painted up.  So far I like how it looks, but I may replace the claws (which are going to represent Lightning Claws) on the Sergeant.


This, however, is an assault squad in progress.  Notice how the bolters have been cut down and the extra pieces used for the katars (which will represent chain swords).  If time is on my side tomorrow I will put up a post detailing how I came up with this design and what brought about its creation.  Till next time!

Friday, August 5, 2011

Hobby Friday- Evolution of a color scheme

When first starting the Pride of the Emperor Space Marine chapter, I realized I would have to tackle something I had never experienced before- creating my own color scheme.  Don't get me wrong, I've had to improvise for single models, such as my Gaulrauch the Chaos Dragon conversion into a Fateweaver, but never on the grand scale of an entire army.  I had a lot of questions that needed answers before I started painting squads.


So where did I start out?  First off I took a look at the overall theme of my army, being lion themed.  As I mentioned previously I used to play a trading card game called Legend of the Five Rings.  Since there was a Lion clan in it, I used my friendly search engine to find what colors they used for the clan.  The stand out colors tended to be yellows and browns.  The yellows made a lot of sense since it fit so well with the lion theme.  Browns, on the other hand, would have to have the right tint to contrast enough with the yellows.


After deciding on the two main colors, I headed over to the Bolter and Chainsword's Space Marine painter.  I fiddled with the image for a while and realized the yellow and brown would need a dark, contrasting color to offset the other two.  It didn't take long for me to realize that a very dark grey would work best.  With my basic color scheme in hand it was finally time to start painting!

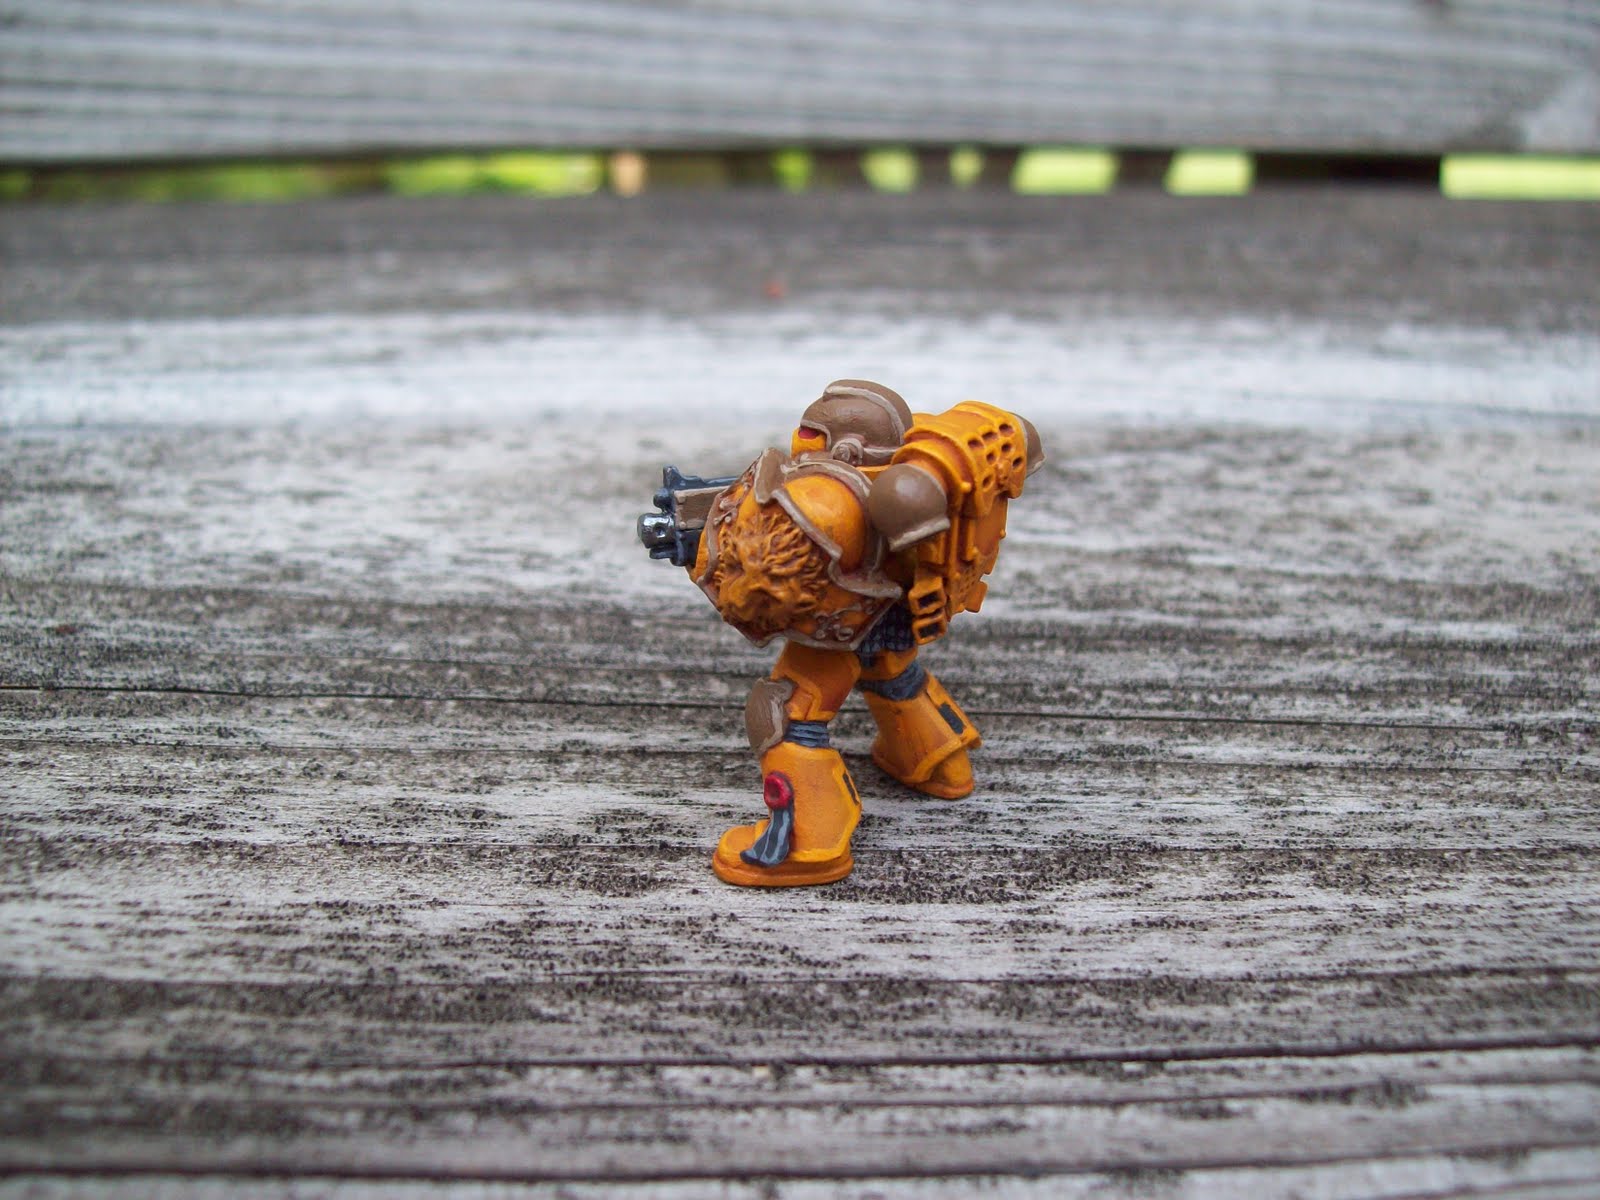
Out came the golden yellow from Vallejo paints and I began.  At first I was initially put off by how bright the yellow was, but decided to stick with it until I had applied a wash.  Using Citadel's Ogryn Flesh, I was able to produce the gritty yellow with a brown tint I had dreamed up.  The brown I had picked was far too close to the highlights of the yellow and didn't stand out enough.  Instead of becoming discouraged and scrapping the entire color scheme, I began experimenting with other browns, finally settling on Tierra Earth by Vallejo.  It had a more dry earth tone as opposed to a wet mud look the previous brown held.


With those colors out of the way it now became easy to highlight the trim, eyes, and other bits.  Finally, I wrote down all of the colors I used into the notebook I'm using to update the chapter so in the future I don't forget the process and have mismatched models.  In the end I was very happy with the results and became excited to start the entire squad of Marines.

So to recap, start out by deciding what basic colors you want for your color scheme.  Ask yourself if they hold any significance to the chapter and if so what that significance would be.  Next, use a program to 'paint' a test marine digitally as it will save you time and paint in the long run.  After settling on the basic colors, paint one test model to find if you like the colors and decide if you need to make any changes.  Don't get discouraged and don't be afraid to make tweaks to bring it more in line with what you had envisioned.  Finally, step back and look at the model and decide if it is pleasing to your eye.  If not, it is best to start over at the first step and find the colors you would be happy with.

In the end, you'll be painting a lot of guys the same colors, and if you don't like how it looks, it will be awful hard to paint more!

Thursday, August 4, 2011

Land Raider Tutorial Post 4

Welcome back to the final tutorial post on the Mk 1 Land Raider.  We finished off last week with the addition of bolters (to act as a twin linked bolter), las cannons, started the tank treads, and added the rear exhaust system.  There isn't a whole lot from a tutorial stand point left to do other than finish the tank treads.  Additionally, I will describe the small bits of flourish I added to give my Land Raider a bit of a unique feel.  So, lets get to it!

Materials:
Plasticard (For Sale sign)

Tools:
Hobby knife
Cutting board
Straight metal rule

 Using your hobby knife, cut enough 1/2" by 1/4" pieces that you'll be able to connect each of the tank treads.  Where the treads are angled you will need to bend the pieces at the center to create a bend and properly connect the tank treads.


Attach your Las Cannons to the tank using super glue and your Mk1 Land Raider is ready for priming and painting!

At this point, there are plenty of things you can do to add to the Land Raider and give it a unique feel.  To give mine a unique feel, I added some lion heads cast in resin to the doors and included some batter strips to the front and side doors.


Little things like this can go a long way in giving your tanks the flavor you are looking for!

Well, that's it for this tutorial.  Over the next few weeks I'll be covering some of my own hobby progress before moving on to adjust the sizes on the Rhino tutorial and starting the Space Marine Predator.  Take care and happy building!