Showing posts with label Tutorial. Show all posts

Monday, February 13, 2012

Space Marine Rhino Chassis part 1

Welcome back to Scratch Built 40k.  Today we will begin the Space Marine Rhino scratch build tutorial.  When this tutorial series is completed you will have a vehicle which can easily be modified to represent a basic Rhino, Razorback, Whirlwind, Predator, or even a Vindicator.  I use InstantMold for a few of the pieces to save time but if you don't have access to it or the parts being duplicated there will be instructions for those pieces (though obviously less detailed).  So with that all said, on to the tutorial!

Materials Needed:
For Sale sign (found at Wal-Mart, hardware stores, etc)
3/16" thick Posterboard (that stuff with Styrofoam inside and thin cardboard on both sides)

Tools Needed:
Strait edged ruler (preferably metal and containing a right angle)
Hobby knife
Super glue or hot glue


Here are the templates for the major pieces of the project, cut from the materials indicated.  If the template sizes indicated aren't matching up to that you print (which has been happening to me sometimes), you may need to mess with the sizes in a paint program.  All the sizes, though, have been made to scale in Paint.net.


First, you will want to cut each of thee pieces from the materials indicated.  Any right angles are made easier by using a triangle ruler.  This will help prevent future mistakes and keep the tank from having a wobbly effect.

Next, gather the wheel well pieces.  From the posterboard cut 2 pieces which are the same length as the plasticard piece but 3/8" shorter from top to bottom.  Using either super glue or hot glue assemble the pieces as show in the image below.  The posterboard pieces will allow for the wheel rims to sit nicely in the wheel well when we get to that step.


Taking a second wheel well piece, glue so that it matches the other side.  Duplicate this effect with the other two wheel well pieces so that the two sides match up.


Now that you have your two wheel wells put together, gather the two posterboard pieces.  Take the piece labeled as the top and cut a 45 degree angle into one of the shorter sides.  The top one you will glue along the edge of the wheel rim with the angled side overhanging past the back edge. You may wish to use 2 pieces of posterboard which measure 1" by 2" to provide for structural support as I have done here.


Glue the other wheel rim in place so that it is flush with the first side you glued.  Next glue the bottom in place so that it has an even distance from the front and back of the wheel rim (this should be almost non-existent).  Taking the front bottom piece glue into place so the long edge is even with the posterboards bottom edge.  Match the front angled piece so it connects the bottom front with the top (it's ok if there is a little overhang- simply trim this using your hobby knife).  Do the same at the back of the vehicle frame.


Next add the wheel well detail pieces to the sides of the vehicle.  Measure carefully the width of the wheel rims with the plasticard attached and cut strips of plasticard which will run the length of the vehicle's wheel frames.  Starting at the front angled part of the wheel well, glue the plasticard in place, following all the way to the back of the vehicle.  At each of the bends, gently score the plasticard with your hobby knife to allow the plastic to bend without breaking apart.  At the very back of the vehicle cut the piece so that it only overhangs about halfway (1/4") down to leave room for the wheel track.  Do the same on the other side.


Using the left over from those plasticard strips (you saved that, right?) add pieces to the front and back just like it appears in the image above.  Now sand all of the edges so that they appear rounded.

Well, this is going to conclude the first tutorial part of this vehicle.  Next week I will go over how to make the wheels, tank treads, front visor, side exhaust ports, rivets, and the top and side doors and hatches.  Till then, happy scratch building!

Thursday, August 4, 2011

Land Raider Tutorial Post 4

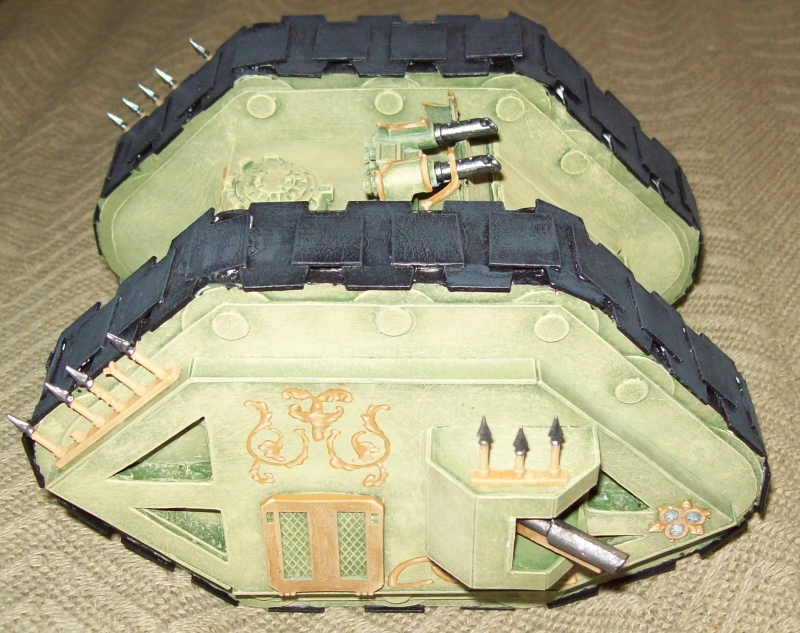
Welcome back to the final tutorial post on the Mk 1 Land Raider.  We finished off last week with the addition of bolters (to act as a twin linked bolter), las cannons, started the tank treads, and added the rear exhaust system.  There isn't a whole lot from a tutorial stand point left to do other than finish the tank treads.  Additionally, I will describe the small bits of flourish I added to give my Land Raider a bit of a unique feel.  So, lets get to it!

Materials:
Plasticard (For Sale sign)

Tools:
Hobby knife
Cutting board
Straight metal rule

 Using your hobby knife, cut enough 1/2" by 1/4" pieces that you'll be able to connect each of the tank treads.  Where the treads are angled you will need to bend the pieces at the center to create a bend and properly connect the tank treads.


Attach your Las Cannons to the tank using super glue and your Mk1 Land Raider is ready for priming and painting!

At this point, there are plenty of things you can do to add to the Land Raider and give it a unique feel.  To give mine a unique feel, I added some lion heads cast in resin to the doors and included some batter strips to the front and side doors.


Little things like this can go a long way in giving your tanks the flavor you are looking for!

Well, that's it for this tutorial.  Over the next few weeks I'll be covering some of my own hobby progress before moving on to adjust the sizes on the Rhino tutorial and starting the Space Marine Predator.  Take care and happy building!

Wednesday, July 27, 2011

Tutorial Land Raider Mk1 Part 3

Welcome back scratch builders to part 3 of the Land Raider Mk 1 tutorial.  We have a lot to cover, so sit back and get ready to dig in!


Materials:
Plasticard (For Sale sign)
1/4" tubing (copper works best)
Soft plastic pen casing (I use Papermate as Bic has raised areas on the pen )
Thin insulated wire
Cardstock
Small bottle to cut up (I used an old, used up Vallejo paint eye dropper)
Smoke launchers (beg a friend or buy for $2 from a bits place
Top hatch (same... these are just too difficult to scratch build and most people have a bunch they'd be happy to give/ sell for super cheap to you)

Tools:
Hobby knife
Super glue
Cutting mat
Straight metal ruler
Wire snipper
Hand drill (drill bits 1.6 mm works best)
1/8" hole punch
Scotch tape

Whew, quite a list!

First, grab a piece of the Cardstock and cut 2 circles measuring 1" across.  Cover any exposed styrofoam with a material of your choosing (I used a Toblerone box and trimmed away the excess).  Glue this to the upper area next to the side doors of the Land Raider as seen in the image below.


Using a hobby knife, cut around the wheel rims to round out the sharp edges of Cardstock to conform to the wheels of the Land Raider.  To make the tracks, grab a piece of Scotch tape measuring 17"- 18" and lay it so the sticky side is face up.  Measure the wheel rims after trimming- you should come up with close to 16".  Cutting 28 strips of Plasticard which are 1" by 1/2", space them out evenly on 16" of the tape.  With the Scotch tape on the inside, wrap the tracks around the tank rims and ensure the fit is snug.  You can see this in the above image.

To create the front bolters (which will count as 1 twin linked bolter), use the following template or purchase/use bits to create your own.


The order to assemble goes as follows- 1 from the bottom right, one from the top right, one from the bottom left, one from the top left, one from the bottom left, one from the top right, and one from the bottom right.  In simpler terms you can start with the top left 1, cut two from the bottom left and add to either side.  Then add the two from the top right and add to either side.  Finally, finish up with the bottom right on either side.  Finish it off with a rectangular piece connecting the two bottom right pieces.  Sand the edges.  Finally, add 3 1/8" Plasticard circles glued together to form the barrel of the gun to the front.  Glue them to the front of the tank's hatch like shown below.


To make the rear exhaust, take your small bottle (which should be about 7/8" wide and 1 3/4" long.  Cut the top and bottom off and split the bottom in half from top to bottom to form half circles.  From the cardstock cut 2 circles which are 7/8" wide to help give the exhaust ports some stability and form the top and bottom of the tanks.  Cut those 2 circles in half and glue them to the top and bottom of the half circle bottles.  Using your pen casing, cut a piece for each tank 1/2" long and glue to the top's center area.  Finally, glue the two tanks to the Land Raider about 1/8" from the top of the back portion.


If you are able to get a hold of spare Las Cannon guns, add those to the side of your tanks side circles.  If not, follow these instructions for making your own Las Cannons.

Using the following template, begin the basic design of the Las Cannon.  You will need to cut out 3 identical pieces of the largest piece, 2 of the second largest, and 1 of the final two pieces.  Assembly is similar to the Bolter, in that the three largest pieces are to be glued together and the next largest glued to either side of those 3 pieces.


Cut 7 1/4" squares from the Plasticard.  Cut an area inside that square which is the thickness of the three glued together Plasticard pieces.


This next bit is complex, so I'll simply show you how those 7 pieces will be added to the guns frame.  Additionally, add a 1/8" circle to the lower angular area as shown in the image below.


Cut a 1/4" from your pen casing and add it to the area which will be facing the tank.  Using your wire clippers, cut 3 2" strips of wire.  Next use the 1/8" hole punch and make 3 circles.  Drill a hole in each one roughly 1/16".  Thread the 3 wires through the holes and spread them out evenly.  Attach one side to the underside of the Las Cannon and measure the other side to sit underneath the bottom of the angled area of the gun.


Now take your copper tube (1/4" dia by 1 1/4" long) and attach it 1/16" from the long area.  Cut your pen casing to make an angled area measuring 1/2" at the top and 5/15" at the bottom.  Slide this onto the barrel to make it a total of 2 5/8" long at the top of the barrel.  Cut 3 3/16" by 1/16" squares from the plasticard and glue them to the top and sides of the gun barrel at the back.  Add another cut pen casing piece 1/8" wide to the back of the barrel.


Add your smoke launchers above the pocket area at the front of the Land Raider.  Take the bottom of the eye dropper bottle you cut off earlier and glue it to the bottom of the top hatch.


Next time- finishing the tank treads and adding rivets/details to your tank.

Saturday, July 23, 2011

Tutorial Land Raider Mk1 Part 2

Welcome back scratch builders.  Today we will continue to build upon the frame of the Land Raider Mk 1.


 Materials:
Plasticard (For Sale signs)
Clear Scotch tape

Tools:
Standard size hole punch
1/8" Hole punch
White glue
Super glue
Hobby knife
Self healing cutting mat
Metal straight edge ruler

Begin by cutting out the template below and making 2 copies of each from the Plasticard.  Glue these into place using either the white glue or the super glue.


On all but the front/top slope of the wheel rim, cut strips of Plasticard with a width of 3/16" to fit and cover the exposed styrofoam.  For the front/top slope cut a piece which is the exposed length and 3/8" wide.  Cut a 45 degree angle at each side so it looks like the image below.


Cut out 2 rectangular strips from the Plasticard which is 1 1/2" long by 1/4" wide.  Make slits at the 1/4" mark measured from the top and the bottom and carefully bend it in these two areas.  Glue onto the tank as it appears on the image below on either side of the tank.  Also, use the 1/8" hole punch to make 28 holes from the Plasticard and place them in the center of the standard sized hole punches already on the model.


Now use the following template to cut out the side door frames.


Glue the larger frame and the smaller frame together with even spacing all around..  Do this twice.  Place the door frames at the rear on the sides of the model, about 1/4" from the bottom and 1/8" from the side trim piece


Cut 4 of the small pieces out and cut slits under the doors and glue the pieces in as seen in the image below.


As you can see, I've also added smaller rivets to the trim pieces.  This was achieved by using a small copper tube and a hand drill and pressing it into the plasticard over and over until I got the amount of rivets I wanted (this process can be seen in the Dreadclaw tutorial seen here).

Now take the Plasticard and cut 4 1 1/4" by 1/2" strips.  One of these cut right down the middle length wise.  On front door hatch area place a split piece on either side with the long angled side facing the rim wall.  Place another direction in the center.  The pieces should be even with the top and sticking out of the bottom of the piece.  Now place the last two on the bottom piece as seen in the image below.


As you can see, it now looks like a hatch which can open and close.

Since the next bit is incredibly fiddly and complex, I will save it for next time.  At that time I will cover making the treads, the front bolters, and the Las Cannon (yes, scratch built).  Till next time, take care all!

Tuesday, July 19, 2011

Tutorial: Landraider Mk1 part 1

Welcome back one and all to Scratchbuilt 40k's newest tutorial, the Mk 1 Landraider.  Today we will form the general shape of the wheel rims and the tanks center mass.  (There will be some changes and additions to the previous design seen below)


Materials Needed:
Cardstock (3/16" thickness)
Plasticard (For Sale signs)

Tools Needed:
Hobby knife
Hot glue gun
White glue (Elmers, etc)
Standard size hole punch
3/4" hole punch
Metal ruler

First, use the following template to make 4 wheel rims cut from the Cardstock.


Now, using the scrap pieces you have lying around, hot glue 3 pieces of Cardstock together and hot glue another wheel rim to them.  Do this again for the other two wheel rims.


Draw 8 1 1/2" diameter circles on the Plasticard and use your hobby knife to cut them out.  Glue them with the white glue to the side of the wheel rims at the front and back.  Now use the 3/4" hole punch and cut 14 circles from the Plasticard.  Use your hobby knife to cut these circles in half.  Using white glue, attach these half circles in the pattern shown in the image below.  Repeat this on the other side and on the second wheel rim.


Now use your hobby knife to cut the following shape out of the Plasticard.  Make 4 of these.


Glue a piece to either side of the wheel rim.


Next cut the following shape from the Cardstock and glue it using the super glue to the wheel rim.


On the other rim glue it to the other side.  This is very important as this forms the outside details of the tank.  If you are concerned about mixing this bit up, you may save this step for after you attach the tanks cab pieces.


Now using the standard size hole punch make 28 circles from the Cardstock.  Use the white glue to glue them in the way it appears in the above image.

Cut rectangular pieces of Cardstock in these shapes; 2" by 3" (bottom piece), 2" by 2 1/2" (back piece), and 2 by 2 11/16" (top piece).  Starting with the bottom piece, glue horizontally 5/8" from the bottom of the inside of the wheel rim as close to the center as you can (there should be roughly 1/8" either side showing the inside detail plasticard).  At a 90 degree angle (vertically) glue the back piece to the back of the tank (the area without the extended slope)- this will be on top of the bottom piece, not behind it.  Finally, glue the top piece horizontally, starting in front of the back piece.


Now cut a piece of Plasticard which is 3" long by 2" wide.  Split the 3" area in half by lightly scoring the Plasticard and gently bending it to create an angled area.  Glue it into place as it appears above.

Finally, use 3 pieces of Cardstock to prop the bottom of the tank and the one wheel rim.  Apply glue to the tanks cab area and attach the other wheel rim.


That completes the first part of the Mk 1 Landraider tutorial.

Thanks everyone for being so patient and checking in after the long absence.  Next time we will tackle the front door hatch, side lascannon turrets, and some other details.  Take care all!

Friday, June 10, 2011

Chaos Dreadclaw Tutorial 4

Welcome to the final installment of the Dreadclaw tutorial.  This one is a doozy, so lets get right on it!  When you finish this tutorial, the Dreadclaw will look something like this:


So on to the tutorial!


Materials:
Plasticard
Wire
Bic pen
Cardstock

Tools:
Hobby knife
Cutting mat
White glue
Hand drill with small copper tube

Last image from Dreadclaw Tutorial 3:


Using the template provided below, cut the plasticard to make 8 pieces of trim.  Using the white glue, position the trim pieces over the bottom areas.


Take a sheet of plasticard and place it on the bottom portion of the dreadclaw, tracing out the bottom shape.  Cut the piece out and cut a hole in the center the same size as the hole in the hatch.  Glue the hatch into place using the super glue.  Finally, glue the bottom piece into place so it looks like the image below.


Using a pen casing (preferably a soft plastic which resembles the plasticard), cut the tube to make 8 pieces which are 3/8" wide.


Using the piece cut from the center of the template on this page, super glue the tubes to the middle of each piece.


This is a good place to create a design to give your Dreadclaw some flair.  For mine, I cut each piece to look like this:


Glue these into the spaces opened from the template on this page.  Next cut 16 rectangle pieces which are 1/4" by 3/8".  In a circular pattern, glue them in a circular pattern around the hatch as it appears below:


Next cut 8 squares which measure 7/8" by 3/4".  These will be used to surround the top area as seen below.


After completing this part, use the bottom template to cut 4 pieces out of the plasticard and attach to the corners of the top area still exposed.


Use the super glue to put these into place.


Now, take the copper tube and sharpen  it.  Place the tube into the hand drill and secure it.  We will be able to use this tool to make our rivets from the plasticard (and there will be a lot of them!).


Place the rivets on the trim areas of the Dreadclaw.


Using the cardstock , cut a circle which is 1 3/4" wide.  Cut another 4 pieces of the pen casing, this time angle one side of each one.


Using your wire, braid together 3 strands roughly 12" long.  Cut this strand into 4 pieces.


Superglue the pen casings to oppose each other and angling the high point inward.  Arrange the wires in a pattern of your choosing.


Glue this piece to the top, inner area of the Dreadclaw as shown below.


Now sit back and admire your craftsmanship!  The nice thing about Chaos models is they lend well to added pieces, so if you have ideas for added bits, feel free.